Hello friends,
Today, I will present you with the iPhone App I developed for my bachelor’s thesis. One of my biggest hobbies is Olympic weightlifting, so I developed a movement- and object-tracking app for iOS to help analyze and improve one’s weightlifting technique. But what is Olympic weightlifting?
Short primer for Olympic weightlifting
Well, there are two different disciplines that have the goal of getting a barbell from the floor to an overhead position. The first one is the snatch, which is one continuous movement, and the second one consists of actually two movements, the clean & jerk. The clean is concerned with getting the barbell from the floor to the front-rack position, where it lies on the shoulders of the athlete, and the jerk then gets it into the overhead position.
The Snatch
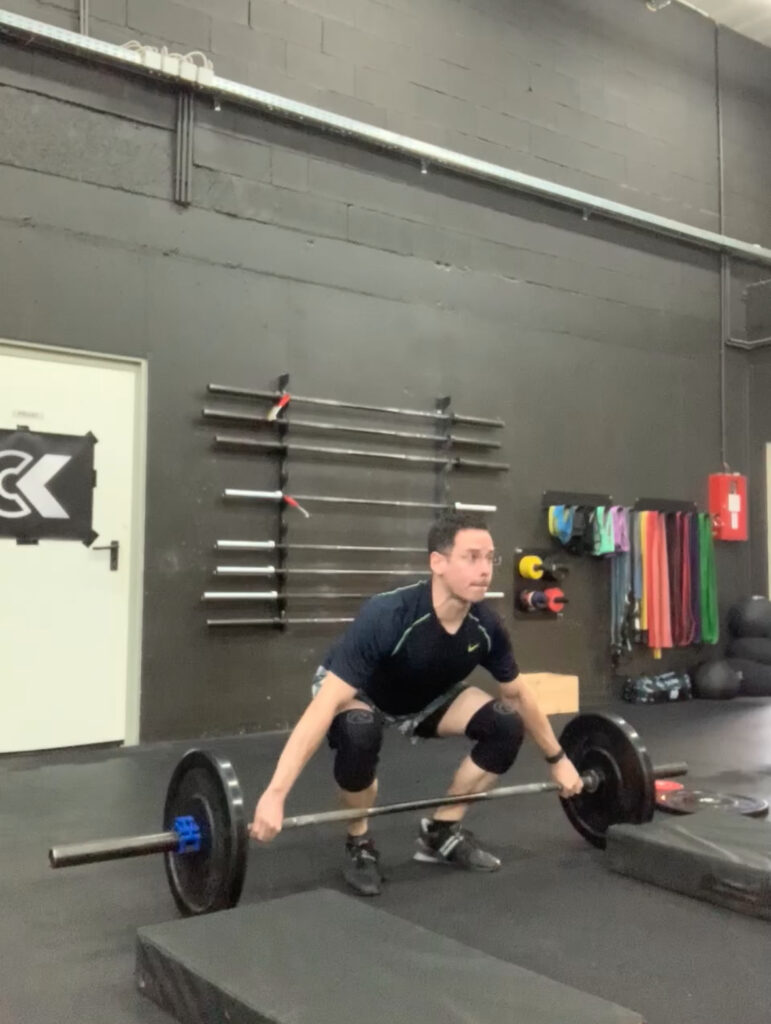
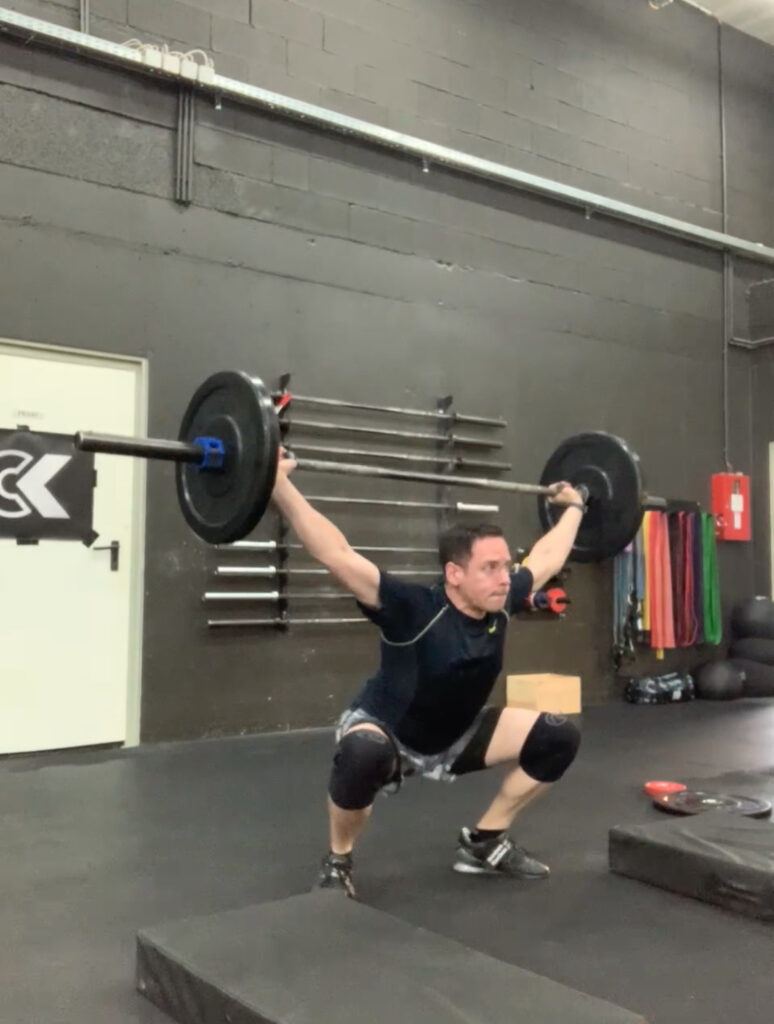
The Snatch is one continuous movement in which the barbell is lifted from the floor over the head without any stops. A wide grip on the barbell is used, and the hips are very low.
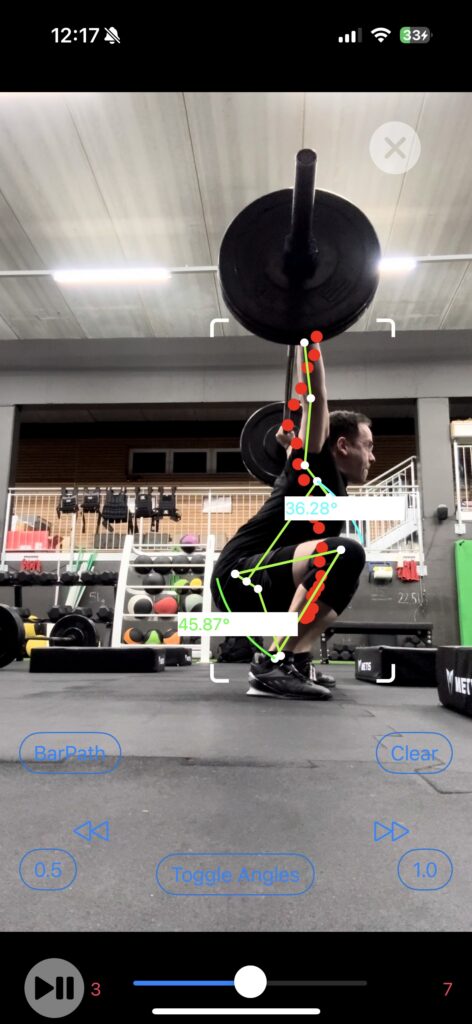
At first, the athlete applies pressure through his feet to get the barbell to his knees while maintaining the same angle with his back. Then, the back is used to pull the barbell as close to the hip as possible before the knees, and the hip gets fully extended while pulling the barbell as high as possible before the athlete pulls himself under the barbell back into a squat position, and catches the barbell over his head as seen in the picture. After that, he has to stand up again to finish the lift.
The Clean and Jerk
The second discipline, the Clean and Jerk, consists of two movements. The first one is the Clean, in which the athlete starts with a narrower grip compared to the Snatch and a higher hip.
Similar to the Snatch, the athlete applies pressure through his feet and gets the barbell to his knees. After that, he pulls it only to the mid-thigh before fully extending and pulling himself under the bar. But instead of catching the bar in the overhead position, he catches it in the so-called front-rack position, which means in front and very close to the neck on the shoulders, which are brought forward.
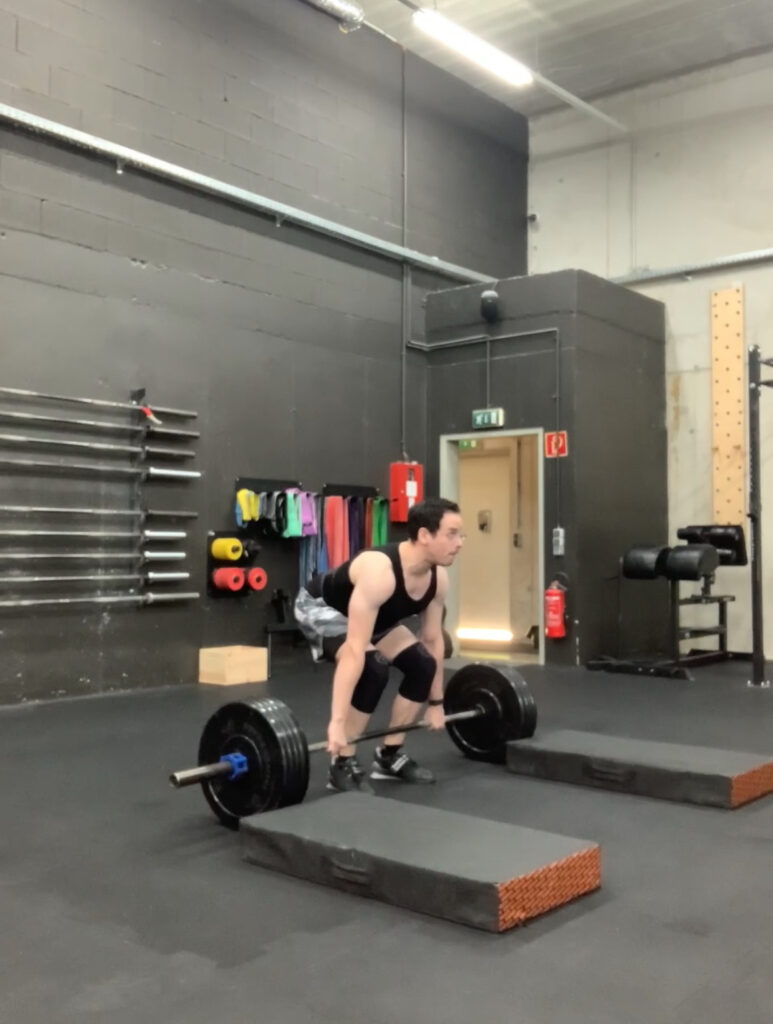
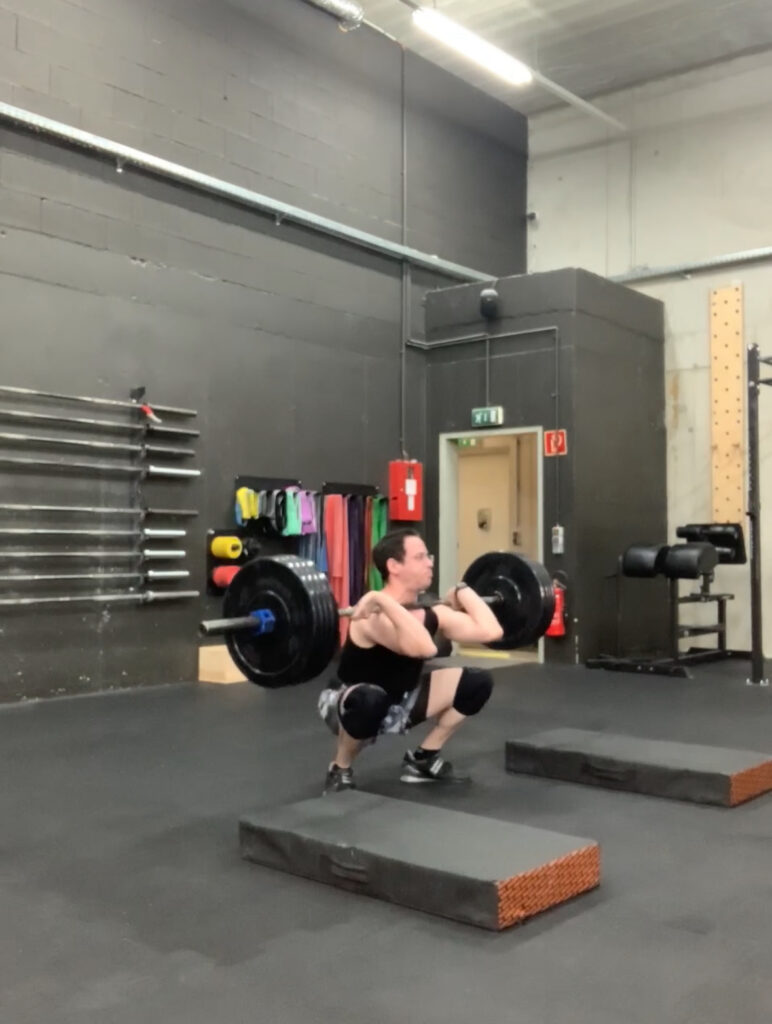
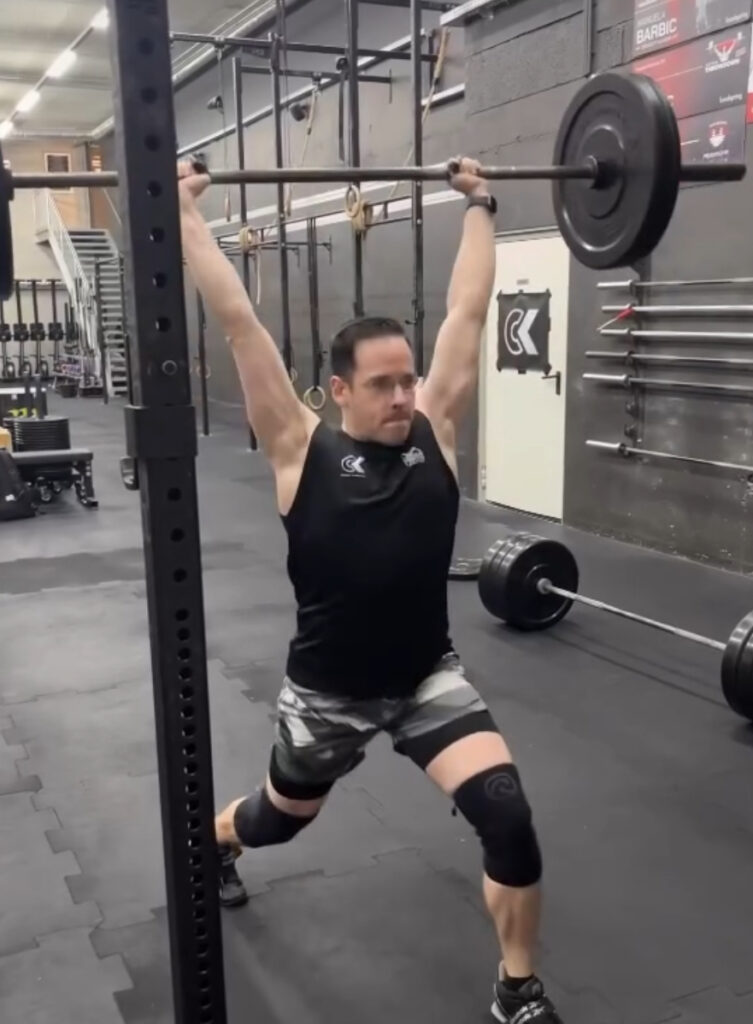
After catching the barbell in a deep squat, the athlete has to stand up to finish the Clean. After that, the second movement, the Jerk, is initiated. There are different Jerk variations, but the most commonly used is the Split Jerk. To perform the Split Jerk, the athlete dips into the knees before fully extending and driving the barbell upwards with his legs. He then splits his legs and pushes himself under the bar into a lunge position to catch the barbell with fully extended arms. He then stands back up and gets his feet into a parallel position to finish the lift.
The App
I developed the app using Swift and UIKit since I based it on a sample app from Apple, which also used UIKit. The app uses Apple’s Vision framework for most of its functionality, which uses machine learning to perform many different tasks on video or images.
Now, how does the app help you with Olympic Weightlifting?
It shows you the most important angles of your body and the path the barbell took during the lift. How is that done? By use of Apple’s Vision API and a self-trained machine learning model. Let’s take a look at some of the app’s code.
Once you open the app, you decide whether you want to look at live footage or pick a pre-recorded video (which works better). I used a UIImagePickerController to pick the video, which displays the videos in the user’s photo library. Once the user selects a video, its URL is used to store it as an AVAsset in the app’s StateManger.
@IBAction func handleUploadVideoButton(_ sender: Any) {
	let videoPicker = UIImagePickerController()
	videoPicker.sourceType = .photoLibrary
	videoPicker.mediaTypes = [UTType.movie.identifier]
	videoPicker.videoExportPreset = AVAssetExportPresetPassthrough
	videoPicker.delegate = self
	present(videoPicker, animated: true)
}

func imagePickerController(_ picker: UIImagePickerController, didFinishPickingMediaWithInfo
	info: [UIImagePickerController.InfoKey : Any]) {
	guard let url = info[UIImagePickerController.InfoKey.mediaURL] as? ,→ URL else {

	picker.dismiss(animated: true, completion: nil)
	return
}
	stateManager.recordedVideoSource = AVAsset(url: url) picker.dismiss(animated: true){
	self.videoSelected = true }
}
The StateManager is responsible for keeping track of the application’s state and displaying the correct views at the proper time. The StateManager uses a GKStateMachine and its own State class, which inherits from the abstract GKState class. Those are part of Apple’s GameKit framework. The StateManager also defines a StateChangeObserver protocol, which the ViewControllers adopt to react to changes in the application’s state.
Processing Video
The AVAsset we created earlier is then used to create a CADisplayLink, which is needed for image processing, and the AVPlayer, which is used for video playback.
videoRenderView = VideoRenderView(frame: view.bounds)
        setupVideoOutputView(videoRenderView)

        // Setup display link
        let displayLink = CADisplayLink(target: self, selector: #selector(handleDisplayLink(_:)))
        displayLink.preferredFramesPerSecond = 0 // Use display's rate
        displayLink.isPaused = true
        displayLink.add(to: RunLoop.current, forMode: .default)

        guard let track = asset.tracks(withMediaType: .video).first else {
            AppError.display(AppError.videoReadingError(reason: "No video tracks found in AVAsset."), inViewController: self)
            return
        }

        let playerItem = AVPlayerItem(asset: asset)
        player = AVPlayer(playerItem: playerItem)

        let settings = [
            String(kCVPixelBufferPixelFormatTypeKey): kCVPixelFormatType_420YpCbCr8BiPlanarFullRange
        ]
        let output = AVPlayerItemVideoOutput(pixelBufferAttributes: settings)
        playerItem.add(output)

        self.setObserverToPlayer()
        player.actionAtItemEnd = .pause

        player.play()

        self.displayLink = displayLink
        self.playerItemOutput = output
        self.videoRenderView.player = player


        videoFileFrameDuration = track.minFrameDuration
        displayLink.isPaused = false

        view.bringSubviewToFront(playPauseButton)
While the CameraViewController, which displays the video, implements the AVCaptureVideoDataOutputSampleBufferDelegate protocol, it also defines the CameraViewControllerOutPutDelegate protocol, which its subviews implement so they can use the CMSampleBuffer it creates. The CMSampleBuffer was created using the DisplayLink we created earlier and then used for image processing operations.
@objc
    private func handleDisplayLink(_ displayLink: CADisplayLink) {
        guard let output = playerItemOutput else {
            return
        }

        videoFileReadingQueue.async {
            let nextTimeStamp = displayLink.timestamp + displayLink.duration
            let itemTime = output.itemTime(forHostTime: nextTimeStamp)
            guard output.hasNewPixelBuffer(forItemTime: itemTime) else {
                return
            }
            guard let pixelBuffer = output.copyPixelBuffer(forItemTime: itemTime, itemTimeForDisplay: nil) else {
                return
            }
            // Create sample buffer from pixel buffer
            var sampleBuffer: CMSampleBuffer?
            var formatDescription: CMVideoFormatDescription?
            CMVideoFormatDescriptionCreateForImageBuffer(allocator: nil, imageBuffer: pixelBuffer, formatDescriptionOut: &formatDescription)
            let duration = self.videoFileFrameDuration
            var timingInfo = CMSampleTimingInfo(duration: duration, presentationTimeStamp: itemTime, decodeTimeStamp: itemTime)
            CMSampleBufferCreateForImageBuffer(allocator: nil,
                                               imageBuffer: pixelBuffer,
                                               dataReady: true,
                                               makeDataReadyCallback: nil,
                                               refcon: nil,
                                               formatDescription: formatDescription!,
                                               sampleTiming: &timingInfo,
                                               sampleBufferOut: &sampleBuffer)
            if let sampleBuffer = sampleBuffer {
                self.outputDelegate?.cameraViewController(self, didReceiveBuffer: sampleBuffer, orientation: self.videoFileBufferOrientation)
             }
        }
    }
Detecting a human body
Once this setup is done, we can use a VNDetectHumanBodyPoseRequest on our buffer to detect the human body in individual images. This is one of the built-in Vision API ML models. It delivers not only the person’s position in the image but also identifies up to 19 joints or unique body points and their locations in the image.
private let detectPlayerRequest = VNDetectHumanBodyPoseRequest()
let visionHandler = VNImageRequestHandler(cmSampleBuffer: buffer, orientation: orientation, options: [:])

do {
            try visionHandler.perform([detectPlayerRequest])
            if let result = detectPlayerRequest.results?.first {
                let box = humanBoundingBox(for: result)
                let boxView = playerBoundingBox
                DispatchQueue.main.async {
                    let inset: CGFloat = -20.0
                    let viewRect = controller.viewRectForVisionRect(box).insetBy(dx: inset, dy: inset)
                    self.updateBoundingBox(boxView, withRect: viewRect)
                    if !self.playerDetected  {
                        self.stateManager.stateMachine.enter(StateManager.DetectedAthleteState.self)
                    }
                }
            }
        } catch {
            AppError.display(error, inViewController: self)
        }
The detected joints are then passed to a separate view that draws the joints and limbs over the image before displaying it to the user. The arcs representing the angles of the knees and hips are also used to calculate these angles. These body pose requests are performed on the main queue, like the video output, so the highlighted joints align with the athlete.
Detecting and Tracking an Object
To detect an object, a barbell, in the case of this app, I used a custom-trained ML model that I trained on pre-annotated pictures from roboflow.com. The application then uses the model to create a VNCoreMLRequest, which is needed for the VNImageRequestHandler, which performs the request, similar to the human body pose request. The handler returns an array of VNDetectedObjectObservations, which can be used for further processing. I stored the first element in the StateManager as it should be our barbell (but it isn’t all the time).
private var barbellDetectionRequest: VNCoreMLRequest!

let model = try VNCoreMLModel(for: BarbellDetector(configuration: MLModelConfiguration()).model)

barbellDetectionRequest = VNCoreMLRequest(model: model)
barbellDetectionRequest.imageCropAndScaleOption = .centerCrop

let visionHandler = VNImageRequestHandler(cmSampleBuffer: buffer, orientation: orientation, options: [:])
        try visionHandler.perform([barbellDetectionRequest])
        var rect: CGRect?
        var visionRect = CGRect.null
        if let results = barbellDetectionRequest.results as? [VNDetectedObjectObservation] {
            // Filter out classification results with low confidence
            let filteredResults = results.filter { $0.confidence > barbellDetectionMinConfidence }
            if !filteredResults.isEmpty {
                visionRect = filteredResults[0].boundingBox
                rect = controller.viewRectForVisionRect(visionRect)
                stateManager.detectedBarbellObject = filteredResults[0]
            }
        }
Now, the goal was to detect and track the barbell during the lift. Swift seems to offer multiple solutions, some more complex than others.
Trajectory Requests
One option the Vision API offers is to track trajectories in a video. This Vision algorithm allows the detection of trajectories of moving objects in a sequence of multiple images. If provided with a stable scene, it can detect even small objects and their trajectories, like balls or pucks, making it suitable for all kinds of sports and fitness apps. The algorithm also allows developers to specify filtering criteria to track objects moving in a specific direction or area or to track objects with a minimum and maximum size.
I tried to implement this functionality at first, but I could not get any usable results. This might be because there is too much noise in the video or because the barbell does not move in a way that the algorithm recognizes. So, I had to try other methods.
Track Object Requests
Now, this method seemed very promising, too. The VNTrackObjectRequest needs an initial object to track (like the one we detected before and stored in the StateManager) and tracks it through a sequence of images from a video. This method produced usable results at first, but at some point, the coordinates of the results did not match the position of the barbell anymore, and I could not determine the source of that issue. If you encountered something like that before, let me know.
Simple Implementation
So.. what did I do? I only wanted to draw the bar’s path during the lift over the video. So, in the end, I just used the same request I used, in the beginning, to detect the barbell over and over again on every image and marked the detected location.
Conclusion
While there are many areas of the app that could be improved, I achieved all my main goals for the project and learned a lot while developing it. The Vision framework is great and has lots of potential for many different sports apps. But I have to say, I prefer SwiftUI over UIKit. I might try to adopt the app to SwiftUI in the future if I release it on the AppStore. Let me know if you would be interested in an app like that!
Until next time,
Daniel

